
The first quilt I ever made came with the bias tape premade, after that I was on my own. Which really is okay with me because, while you can buy premade bias tape, the selection is limited to say the least. And between you and me making it really isn’t that hard. It took me about an hour and that’s stopping to take photos, watch some TV, have some coffee etc. So I have trouble staying on task, what can I say.
These instructions seem to be the best available on the web, the only problem is there are drawing not pictures. Well we all know how I feel about that so here are my photos.
You will need:
- Fabric- The instructions include a mathematical equation to determine how much fabric you will need but I just used a yard of fabric. I buy fabric with the intention of making bias tape out of it so it makes more sense for me to do it all at once.
- Rotary cutter and/or scissors
- Pencil or other means to mark the fabric
- Straight Pins
- Sewing machine (1/4 in foot guide makes things a bit easier but isn’t necessary)
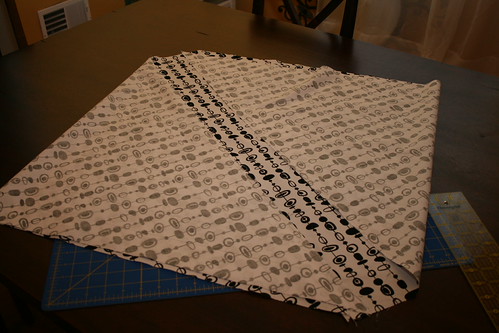
Step 1- Lay your fabric out on the table.

The line drawing in the instructions is a little misleading here is “dotted” line shown on a real piece of fabric

Step 2- Now here is the fabric folded over

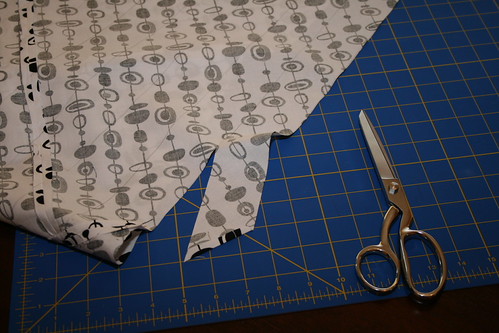
I didn’t use scissor to cut along the folded edges as instructed. Instead I pressed the edge, opened it and used a rotary cutter so that I would have a much cleaner edge.

Cut apart it will look like this.

Step 3- Reposition the piece you just cut off to the other side of fabric you cut it from placing them selvedge edge to selvedge edge like this.

Keeping the selvedge edges together place them right sides together.

Pin together before sewing together using a 1/4 in seam. Afterwards press open the seam.

And it comes out looking like this.

Step 4- Draw your seam lines on the wrong side of the fabric.

I used a regular pencil and clear ruler but could have skipped this step and simply used the edge and the 1/4 in foot on my sewing machine.
Step 5- Drawing parallel lines using the angled edge as your guide,

Here are the lines crossing your 1/4 in seam allowance lines.

When you get to the other side of the fabric you will most likely end up with a strip of fabric that is not wide enough, simply cut this piece off.

You will end up with lines evenly spaced all the way across your fabric.
Step 6- The confusing part… You are going to number the lines you just drew. You will start with zero on the bottom.

That same line on the top will be labeled 1 and you will number the lines up from there like this.

Flip the fabric over so that the right side is up and bring the numbered edges together.
Step 7- Ignoring the line marked zero bring the two lines labeled 1 together.

Pin the intersection together. Now this is tricky too. Bring the edges of the fabric together and then using the 1/4 in seam line fold the fabric over to line up the two lines.

This is the only way to make sure the you will have a continuous line once the raw edges are sewn together.

I can’t stress how important this is, trust me I made this mistake. You will end up with lines that are no where near to one another once the seam is sewn and you will have to do it all again.
Done correctly you will end up with this.

Step 9- Sew the 1/4 in seam you just pinned.
Mine didn’t end up twisted at all but it does look a little weird as your try to sew along the edge you just created.

Generally I like to take pins out as I sew but in this case I left them in place to ensure the fabric didn’t move around.
Step 10- Press open.

Step 11- Here is your tail.

Step 12- Cutting time.
Just keep following your line around and around and around. If the fabric is puddled in your lap make sure you aren’t cutting any of the fabric accidentally as you work your way around.
At this point I suggest moving to the couch as this can take awhile. Eventually though you will get to the end.

This is what you get for your hard work.

At first glance it may not appear like a lot of fabric but trust me it is.

I fold my bias tape in half and press but how you treat it depends on what you plan on doing with it.
I always use bias tape so I make sure to keep in mind how a pattern will look on the bias (which can be dramatically different from how it looks up and down) when choosing binding fabrics.


Fabulous tutorial. I just ordered a bias tape maker, waiting for it in the mail. I have no idea how to use it. Bummer cause it looks like this would have been the way to go. I wonder if I can cancel my order. Thanks for sharing.
Great tip on chosing the right fabric too. I have not used bias tape yet, but I made some place mats that need trimming.
I tried and tried and tried to make bias tape and failed miserable. Part of the reason was the drawings confused me, thanks for the photos!
Excellent tutorial! I will have to try this technique / tutorial as I am a first time bias user 😉
Thanks. This is the best tut on this I’ve ever seen!
I have wanted to make my own bias tape for year, but was intimidated by the instruction. Your instructions and photos make it a lot clearer, and I can’t wait to try making them now. How much fabric did you use (looks like about a yard)? And how much length do you end up with (in bias tape), with that amount of fabric? This would help me figure out how much fabric I will want to use, for the amount of bias tape I need for my project.
Thanks,
Claudia
These photos are so, so helpful! Thank you for this tutorial!
[…] a binding tutorial on the best way to join your lengths (which I understand is on the diagonal?) This tutorial looks pretty damned good (comprehensive and well illustrated with clear photographs). Or you could […]
I did it!!!!! Thank you soooo much. The pictures are great. I am not afraid of bias binding anymore:)
Absolutely brilliant- and so well explained- the photos were super helpful. More tutorials please!!!
Thank you!!! Very informative! I’ve only used pre-made “quilt binding tape” from the store thus far (on the one quilt I had to bind – the other was a rag quilt).
Going to try this and see how it works for me!
hi – i am an advanced seamstress as i have making clothes since i was a teenager. I think i would like your way of doing a continous bias better than those i have seen but unfortunately the pattern you chose stops me from understanding the directions. thank you though – i am attempting to make a 2 inch strip that is 150 inches long with as less seams as possible.
Thanks so much – this is the best tute I’ve found so far on the web – Love the photos – also I really appreciate you using a striped/directional fabric for the photos – helps me figure out which end is uP – so to speak.. lol
Thanks again my quiltfriend!
I did it. Thanks for your great pictures and explanations.
You said you bought 1 yd of fabric, how wide did you cut the bias binding and how many yards did it make?
I had instructions on how to do this in an ancient book which I lost and I’ve been trying to remember how to do this ever since. Your tut is ace! Thank you.
This is genius.
Thanks so much for sharing.
I sew clothes rather than quilts so now I have to hunt down a project that requires lots and lots of bias binding!!
I’ve been going back to this tutorial for over a year now, to refresh my memory every time I want to make some bias tape binding for my buntings. I always get confused at more than one stage in the process, and your pictorial guidance always sets me in the right direction again. Thanks!
I am definitely going to try this, I am a natural clutz. I will feel like I accomplished something if I can do this.
[…] My biggest challenge was making my own bias binding for the first time. I used the instructions from here: https://modernquiltlove.wordpress.com/2009/04/30/how-to-make-continuous-bias-binding/ […]
I have a jacket all made with the exeption of the bias binding around the neck and down the front. I tried to follow this method (with pictures) and did not succeed, consequently I am not wearing the jacket.
What you have done is made it much easier and your pics are so good. You have inspired me. Thanks so much. Here I go again.
Thankyou soooooooo much – this is going to change my life!
How much bias tape does a yard of fabric make? Are you cutting the strips 2 inches wide?
I have made my own bias tape for years, and making continuous bias is definitely the way to go!
I’d like to add that this works with all kinds of materials. I’ve made bias tape using faux suedes, satins, silks, and even leather. It’s a great way of extending the life of scraps, too. “Quilted” bias tapes look awesome as trim for jeans and skirts.
Thanks for the tutorial. I’d considered making my own, but this one is great. Will definitely send friends here.
THANKS! -and the use of ‘striped’ fabric in your pictures makes the whole thing more understandable. I’ve made my own before by cutting strips and sewing them together, but this makes SO much more sense .. especially for big projects, like quilts, when so much yardage is needed. I think I can manage this on my own now.. hurray!
[…] How to Make Continuous Bias Binding – Tutorial on Make It Modern […]
[…] made the binding myself because I already had the fabric I wanted to use. I found this tutorial over on Modern Quilt Love, which made it look really easy. This was the only tutorial I could find […]
I always have to look up how to do this everytime I make one. Just figured out, when you mark you 1/4 inch seam that crosses your marked lines, if you match up the x where they cross, you are right on, on the lines matching up. Didn’t know if that might help others.
This is a wonderful tutorial! I’m making my first quilt and this is the only tutorial I found that really made sense, and it turned out great. Thank you!
Thanks so much for this! It’s so helpful and a great tut! Just made my first one & am SO proud of myself. ;> Only messed up once, at the end of course when I was almost done! I was cutting SO carefully on the lines was more than 3/4 of the way through when I realized I had started cutting the other side of the “tube.” Luckily, I was able to cut out that part & stitch it back together w/o too much trouble. After that I put my arm through the tube & held the fabric up off the table. It was a little trickier to cut straight this way, but much safer! ;>
Hello!
Yesterday I had the job of making bias binding. Having only done it once before many years ago I had completely forgotten. That’s when I came across your tutorial and it was brilliant! Clear, helpful…the binding for my clients quilt looks gorgeous.
I wanted to let you know that I am going to post a pic of the binding and quilt with the link to your post on bias binding because I think it’s that good. And, I have to say, that’s saying a lot because I’m a picky quilter!!
Would love for you to stop by and check it out!
Thanks,
~ h
(thought i’d post it here too. *big grin*)
This is great! I make all my quilt bindings this way, and I have a gadget that when I pull it through it is all folded and ready to iron…no folding!
so glad i found this. i usually make my quilt bindings with a different method. i am finishing a UFO of my grandma’s and the binding fabric was already sewn into that rhombus shape, and i had no idea what to do with it!!